NVIDIA Mellanox Bluefield-2 SmartNIC Hands-On Tutorial: “Rig for Dive” — Part II: Change mode of operation and Install DPDK.
Table of Contents
After firing up an experiment in Cloudlab and getting our hands dirty with Bluefield-2, we continue our journey by elaborating on the different modes of operation and install DPDK on the Bluefield-2.
 We will install and configure the latest DPDK on Bluefield-2 DPU
In Part I, we have installed all necessary drivers on r7525 machines at the Clemson facility of Cloudlabs. Then, we became able to access Bluefield-2 and provide Internet access to it.
Modes of Operation
So, we are given an Arm64-based server inside a server with internet access. We can download and install packages, and once we figured out what applications we want to materialize on top, we can delve deeper.
First, there are different modes our SmartNIC can operate in. According to the documentation, the three modes are the following:
- Separated Host Mode (symmetric model)
- Embedded Function Mode (ECPF)
- Restricted mode (extension to ECPF, so we don’t discuss this further here)
Separated Host Mode
In the Separated Host mode, the SmartNIC functions as a separated host. In other words, you can consider it as a standalone ARM64 server. The SmartNIC can also run any application and can use the Ethernet ports as usual, i.e., as it would be a common NIC in a system. The ports are visible to ifconfig and have their own MAC addresses.
On the other hand, the host system (i.e., the X86-based Server the SmartNIC is installed in) can also use the NIC as usual. The same Ethernet ports are also visible to the Host, but they have different MAC addresses.
Therefore, in this setting, according to the MAC addresses the packets have as destination MAC addresses, the data is either processed by the SmartNIC or by the Host. From a bit more tech-savvy point of view, the packets destined to the Host (or SmartNIC) do not go through the ARM cores (or the Host’s CPU cores). See the figure below to imagine
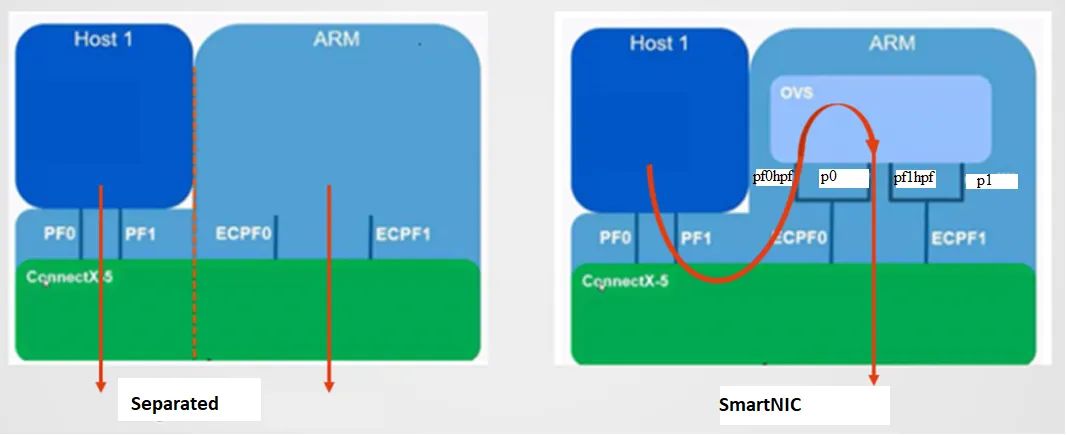 Simple visualization about the differences between the two most important modes (source: https://community.mellanox.com/s/article/BlueField-SmartNIC-Modes)
Embedded Function Mode
This mode is also called SmartNIC mode since the packets are always going through the ARM cores. This also means that you have to be in this mode whenever you would like to practically offload (some parts of) an application running on the Host.
Simple examples when you would need this mode is when you want to run offloaded DPDK applications, such as OvS-DPDK, on your SmartNIC. To reach this end, you have to be in the Embedded Function / SmartNIC mode.
I have also found that even compiling DPDK from scratch (see later) requires this mode of operation.
[Side-track] What is then Separated Host Mode for?
The question immediately arises:
What is the purpose of the default Separated host mode as the reason why we deploy an expensive SmartNIC is to alleviate the pressure on the host applications?
Actually the answer can be much longer than this blogpost itself.
In a nutshell, due to the increasing need for carrier-grade packet processing and secure service provisioning, the cloud tenants of the future rather want Bare-Metal-as-a-Service solutions (BMaaS) instead of leasing the typical virtualized servers. Many public cloud operators already started to provide this option to their tenants.
By having dedicated physical machines, you can get the most out of the network processing speeds, not to mention avoiding all attack surfaces imposed by resource sharing (e.g., side-channel attacks, co-residential attacks, or even a recent covert DDoS attack against the hypervisor switch). Many CISOs (Chief Information Security Officers) also suggest going with the BMaaS model when it comes to service provisioning as you can also make yourself more secure against Meltdown and Spectre attacks. It has been shown lately that they can even compromise the “thought-to-be-fully-secure” trusted execution environments, such as Intel SGX. Such attacks are Load Value Injection, Foreshadow, and SGAxe.
So, if you are the cloud operator, how would you provision the bare-metal services right? That’s what SmartNICs can do for you in the Separated host mode.
Change to Embedded Function Mode on the Host
By default, the SmartNIC is in Separated Host Mode. Since we want to use it to offload applications to itself, we have to change the mode of operation to Embedded Function Mode (or SmartNIC Mode for short).
UPDATE: at least at Cloudlab, I encountered that sometimes, the Bluefield is already in this mode. So after checking it (see below), you might skip this section.
The information gathered here is from digesting the information found on the Mellanox community blog.
Note, everything we do in this section, we do it on the Host!
First, let’s confirm the mode we are at currently.
Start the Mellanox Software Tools (mst) and List Details
# mst start

Starting MST (Mellanox Software Tools) driver set
Loading MST PCI module - Success
Loading MST PCI configuration module - Success
Create devices
Unloading MST PCI module (unused) - Success
# mst status -v
MST modules:
------------
    MST PCI module is not loaded
    MST PCI configuration module loaded
PCI devices:
------------
DEVICE_TYPE             MST                           PCI       RDMA            NET                       NUMA
BlueField2(rev:0)       /dev/mst/mt41686_pciconf0.1   81:00.1   mlx5_3          net-ens5f1                1
BlueField2(rev:0)       /dev/mst/mt41686_pciconf0     81:00.0   mlx5_2          net-ens5f0                1
Cable devices:
---------------
mt41686_pciconf0.1_cable_1
mt41686_pciconf0_cable_0
mt4119_pciconf0_cable_0
Note, other lines appearing in the output but related to the ConnectX-5 NIC, instead of to the Bluefield, is omitted.
The important rows for us are the two last ones. More precisely, the device descriptors in the second MST column as we are going to query their modes. Those descriptors are used in this document to query and set certain properties. If you just copy-paste some of the command below and see no output, please double-check whether the device descriptors used match your setting.
Cable devices
There is something I only want to briefly cover here. That is which resides in the last section in the output saying Cable devices. It might not even be shown for you in the beginning. Mellanox Firmware Tools (mft) can work against the cables that are connected to the devices on the machine. With Mellanox Software Tools (mst), we can discover the cables that are connected. To do so, issue the following command on the Host:
# mst cable add
-I- Added 3 cable devices ..
Now, if you issue the same mst status -v command as above, you will see the detected cable devices.
On the Host:
# mst status -v
...
Cable devices:
---------------
mt41686_pciconf0.1_cable_1
mt41686_pciconf0_cable_0
mt4119_pciconf0_cable_0
Note, you can also do the same on the Bluefield:
# mst cable add
-I- Added 2 cable devices ..
# mst status -v
...
Cable devices:
---------------
mt41686_pciconf0.1_cable_1
mt41686_pciconf0_cable_0
Please refer to the documentation to obtain more information about this.
Get Actual Mode of Operation (still on the Host)
Now, let’s check the variables set to the interface, specifically focusing on the INTERNAL_CPU_MODEL configuration.
# mlxconfig -d /dev/mst/mt41686_pciconf0 q | grep -i internal_cpu_model
INTERNAL_CPU_MODEL                  SEPERATED_HOST(0)
If you are more interested in other features, omit the grep command at the end to get the complete list.
We can see that we are indeed in the default Separated Host Mode.
Change Mode to Embedded (SmartNIC)
We can change this mode to set the INTERNAL_CPU_MODEL variable to 1:
# mlxconfig -d /dev/mst/mt41686_pciconf0 s INTERNAL_CPU_MODEL=1Do it for the other interface as well:
# mlxconfig -d /dev/mst/mt41686_pciconf0.1 s INTERNAL_CPU_MODEL=1To get them activated, we need to power cycle the machine. You can simply issue a reboot command; however, when working on Cloudlab, it is better to do such management operations through the dashboard.
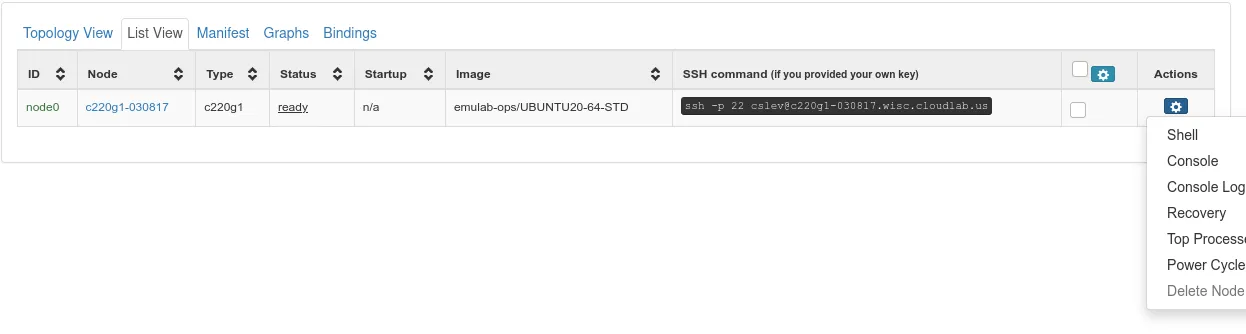 Use the Cloudlab dashboard to power cycle the machine
After reboot, repeat the same commands to confirm the current mode of operation:
# mst start
# mlxconfig -d /dev/mst/mt41686_pciconf0 q | grep -i internal_cpu_model
         INTERNAL_CPU_MODEL                  EMBEDDED_CPU(1)
We can see that we successfully switched the mode to SmartNIC mode (or ECPF mode).
Change/Check modes on the Bluefield
As the section title suggests, we now switch to the SmartNIC and check further there.
Access the Bluefield via rshim
# ssh ubuntu@192.168.100.2
Password: ubuntu
Enable ECPF parameters
# mst start
Starting MST (Mellanox Software Tools) driver set
Loading MST PCI module - Success
Loading MST PCI configuration module - Success
Create devices
Unloading MST PCI module (unused) - Success
# mst status -v
MST modules:
------------
    MST PCI module is not loaded
    MST PCI configuration module loaded
PCI devices:
------------
DEVICE_TYPE             MST                           PCI       RDMA            NET                       NUMA
BlueField2(rev:0)       /dev/mst/mt41686_pciconf0.1   03:00.1                   net-p1                    -1
BlueField2(rev:0)       /dev/mst/mt41686_pciconf0     03:00.0                   net-p0                    -1
Cable devices:
---------------
mt41686_pciconf0.1_cable_1
mt41686_pciconf0_cable_0
We can observe that the output is very similar to the one we saw on the Host above. Note also, we have the cable devices shown in the output.
Check ECPF parameters
Let’s see what are the ECPF parameters currently set.
# mlxconfig -d /dev/mst/mt41686_pciconf0 q |grep ECPF
         ECPF_ESWITCH_MANAGER                ECPF(1)
         ECPF_PAGE_SUPPLIER                  ECPF(1)

# mlxconfig -d /dev/mst/mt41686_pciconf0.1 q |grep ECPF
         ECPF_ESWITCH_MANAGER                ECPF(1)
         ECPF_PAGE_SUPPLIER                  ECPF(1)
If both are set to 1, nothing to do! Otherwise, set them to 1 and power cycle the machine again.
Now, we are in the right mode of operation, i.e., we are definitely in SmartNIC mode, so we can continue our study.
Enable RDMA Link on the both the Host and the Bluefield
What is RDMA, and why do we need it? Originally, RDMA, a.k.a. Remote Directory Memory Access, has been used in high-performance computing (HPC) environments, where it is offloaded to SmartNICs.
RDMA allows low latency transfer of data between compute nodes at the memory-to-memory level without burdening the CPU, i.e., it is a CPU bypass technology for NICs to directly copy the data from the memory to the NIC. More information about RDMA and its benefits can be found here.
So, let’s enable RDMA on our links.
On the Host
# /opt/mellanox/iproute2/sbin/rdma link
link mlx5_0/1 state DOWN physical_state DISABLED netdev enp99s0f0
link mlx5_1/1 state DOWN physical_state DISABLED netdev enp99s0f1
link mlx5_2/1 state DOWN physical_state DISABLED netdev ens5f0
link mlx5_3/1 state DOWN physical_state DISABLED netdev ens5f1
The state of the port should be ACTIVE/LINK_UP/ENABLED. Recall, in this Cloudlab experiment, there is only a single machine without having any connected link for the Bluefields. Note, again, that the first two lines are for the ConnectX-5. This time I did not omit to show it as the identifiers (mlx5_2/3) would raise questions if the mlx_0/1 are not shown :).
On the Bluefield
# /opt/mellanox/iproute2/sbin/rdma link
link mlx5_0/1: state ACTIVE physical_state LINK_UP netdev pf0hpf
...
link mlx5_0/19: state DOWN physical_state DISABLED netdev p0
link mlx5_1/1: state ACTIVE physical_state LINK_UP netdev pf1hpf
...
link mlx5_1/19: state DOWN physical_state DISABLED netdev p1
The ‘…’ above means some extra lines with NOP state DISABLED physical state. They, anyway, should not be there according to the guide, so it is safe to ignore them (for now).
The representors we can observe actually have a meaning. The ones in active state, i.e., pf0hpf/pf1hpf are representors of the ports towards the Host, while p0/p1 are facing the network itself. This is the reason why we can see them as ACTIVE/LINK_UP. Refer to the figure (reinsterted below) again to confirm.
Simple visualization about the differences between the two most important modes (source: https://community.mellanox.com/s/article/BlueField-SmartNIC-Modes)
Two extra interfaces: pf0sf0 and pf1sf0 ?
UPDATE: Recently, I have repeated my steps on a Cloudlab machine, but not the same as before of course. After enabling RDMA on the Bluefield, I have also realized two more additional interfaces:
...
link mlx5_1/50 state ACTIVE physical_state LINK_UP netdev pf1sf0
...
link mlx5_0/50 state ACTIVE physical_state LINK_UP netdev pf0sf0
...
link mlx5_2/1 state DOWN physical_state DISABLED netdev eth0
link mlx5_3/1 state DOWN physical_state DISABLED netdev eth1
At the moment, I am not quite sure what those interfaces are, as I only found them online in documentations wherein Open vSwitch (OVS) is already installed and/or configured. In my case, there is no OVS installation on the Bluefield (yet).
Running dmesg, though, tells me some secret.
 Investigating what pfXsf0 interfaces might be
It seems they are just renamed from the original two interfaces that should have been seen as the default networking interfaces in the beginning, namely eth0 and eth1. However, checking them with ifconfig -a, I observe that both the new pfXsf0 interfaces and the eth0/1 interfaces are visible (though not confgured or enabled/active).
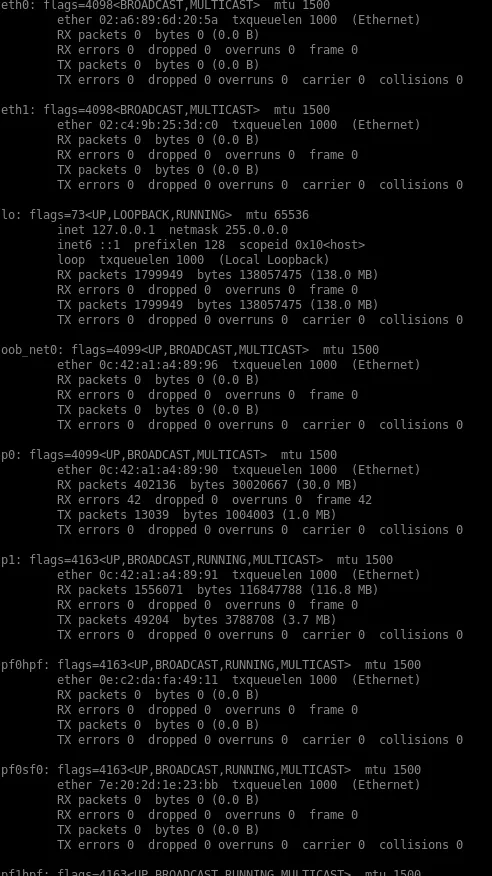 The output of ifconfig -a. We can see both eth0/1 and pfXsf0 interfaces.
This also confirms that the status of eth0 and eth1 in the output of the rdma command above is also DISABLED.
Configuring DPDK on Bluefield
Okay, DPDK is something I am not going talk about here, sorry. I do hope that readers starting to read my posts on the whole topic are anyway possessing the required background. Additionally, I hope I would not tell you new information by mentioning OvS besides DPDK :)
Let’s see. DPDK (among many other drivers) might be installed on the Bluefield by default. This means that unless you do not install any customized OS on top of the SmartNIC (or someone deleted it), you should have DPDK. It might not be the freshest version, but still available.
Hugepages
Before digging deeper, let’s enable hugepages. By default, the SmartNIC does not use “HUGE” hugepages, so all the 16G memory is in “normal” state.
# cat /sys/kernel/mm/hugepages/hugepages-1048576kB/nr_hugepages
0
# cat /sys/kernel/mm/hugepages/hugepages-2048kB/nr_hugepages
0
We are going to use the smaller 2M hugepages as they are much easier to enable on running systems without restarting the machine. Accordingly, let’s reserve 1024 x 2M hugepages for any DPDK applications we will run in the future.
# echo 1024 > /sys/kernel/mm/hugepages/hugepages-2048kB/nr_hugepagesMount Hugepages
Option 1:
# mkdir /mnt/huge
# mount -t hugetlbfs nodev /mnt/huge
Option 2 (I always do this):
# mountpoint -q /dev/hugepages || mount -t hugetlbfs nodev /dev/hugepagesDPDK Sources and Tools
The files and tools for DPDK, if installed by default, are located at /opt/mellanox/dpdk.
TL;DR and I anyway have no DPDK installed — Go to the next section of Compiling DPDK 20.11.1 with Meson and Ninja Builds.
One thing that will definitely work is the good-old dpdk-devbind.py
# /opt/mellanox/dpdk/share/dpdk/usertools/dpdk-devbind.py --status
Network devices using kernel driver
===================================
0000:03:00.0 ‘MT42822 BlueField-2 integrated ConnectX-6 Dx network controller a2d6’ if=p0 drv=mlx5_core unused=vfio-pci
0000:03:00.1 ‘MT42822 BlueField-2 integrated ConnectX-6 Dx network controller a2d6’ if=p1 drv=mlx5_core unused=vfio-pci
Following the Mellanox blogpost about Configuring DPDK and Running testpmd on BlueField-2, I found that the vendor-supplied DPDK is not running at all.
# /opt/mellanox/dpdk/bin/testpmd -w 03:00.0,representor=[0,65535] -- -i -aFirst, I have never addressed, or more precisely, whitelisted a port for a DPDK application. So, no matter how I tried to used the good-old technique by speechifying ports explicitly via -w 0000:03:00.0 -w 0000:03:00.1 arguments, or playing with the repsentors, DPDK never found the ports and quit.
Consequently, I quickly switched to the alternative solution also mentioned in the same blog, to manually install DPDK. I personally prefer this way as I can configure DPDK before compiling and also see and check during the compilation process that all required libraries are properly install. Otherwise, compilation fails. However, even though the blog post install a pretty up-to-date DPDK (v.20.05), the method followed is the outdated one; it uses make config and make (install). According to the latest documentation, however, DPDK should be configured and compiled via meson and ninja.
Anyway, I gave a try to the following tool-chain:
# make config T=arm64-armv8a-linuxapp-gcc
# make
# make install
While DPDK libraries themselves were compiled properly, test applications were not at all. Thus, testpmd application, besides other example apps, must have been compiled separately. And, at this time, I have bumped into a failure as the compiler was complaining about undefined reference to rte_ring_. *At this point, after trying to resolve the issue with some common ways found online, I rather switched to the official DPDK documentation and the latest versions.
Compiling DPDK 20.11.1 with Meson and Ninja Builds
First, install all the libraries we need:
# apt-get install libc6-dev libpcap0.8 libpcap0.8-dev libpcap-dev meson ninja-buildIn my experiment, only libc6-dev was not installed, all other libraries were already present on the Cloudlab host.
First, download the tarball of the latest DPDK 20.11.1 (LTS).
# cd ~
# wget https://fast.dpdk.org/rel/dpdk-20.11.1.tar.xz
Now, uncompress it and go to its directory
# tar -xJvf dpdk-20.11.1.tar.xz
# cd dpdk-stable-20.11.1
Export RTE_SDK and RTE_TARGET variables to be accessible for any DPDK application.
# export RTE_SDK=/home/ubuntu/dpdk-stable-20.11.1
# export RTE_TARGET=arm64-armv8-linuxapp-gcc
Now, we are ready to build DPDK with meson and ninja.
Let’s configure with meson. For meson, in order to compile test applications, such as testmpd, we have to set an extra argument as follows.
# meson -Dexamples=all buildThis should find mlx5 driver, if not install MLNX_OFED drivers on the Bluefield.
Compile and install DPDK libraries on the Bluefield with ninja.
# ninja -C build
# ninja -C build install
If everything works fine, you are done with installing the latest LTS release of DPDK on the Bluefield.
Running DPDK applications on Bluefield
After installing DPDK without any errors, we can finally get our hand dirty with it. First, to verify the correct behaviour, we try to launch the built-in example applications, testpmd. Later, we will also compile a non-example application, pktgen, the canonical packet generator used in many DPDK testbeds.
testpmd
Navigate to your dpdk installation directory and issue the following command.
# build/app/dpdk-testpmd -c7 -w 0000:03:00.0 -w 0000:03:00.1 -- -i -aThis will start testpmd with two ports (whitelisted with -w), and for the testpmd application itself we assigned 3 cores (-c7). The last arguments after the EAL options, i.e., after ‘ — ‘, starts testpmd in an interactive mode.
Now, you can print out stats, start transferring packets and receive them back if there is a forwarder on the other side.
testpmd> show port stats all
testpmd> start tx_first
testpmd> stop
pktgen-dpdk
After this point, having an Ubuntu system with version 20.04, and DPDK 20.11.1, it is mandatory to choose any further application’s available version wisely. I remember how much time I was spending in the beginning on trying to fix compilation errors, whereas changing to the right version would have solved the issue in the first place.
Accordingly, the version of pktgen that was working in our setting was 21.02.0. Let’s grab this one, uncompress and compile it.
# wget https://git.dpdk.org/apps/pktgen-dpdk/snapshot/pktgen-dpdk-pktgen-21.02.0.tar.xz
# tar -xJvf pktgen-dpdk-pktgen-21.02.0.tar.xz
# cd pktgen-dpdk-pktgen-21.02.0/
# make
However, at this point I have run into some compilation errors:
...
/usr/local/include/rte_spinlock.h:9:4: error: #error Platform must be built with RTE_FORCE_INTRINSICS
    9 | #  error Platform must be built with RTE_FORCE_INTRINSICS
      |    ^~~~~
...
I have checked the DPDK configuration variables, and all RTE_CONFIG parameters are actually set to 1, i.e., enabled and built with. You can do a quick check in your DPDK directory and you will find that, specifically, this macro is set to 1.
# cd $RTE_SDK
# grep -ri “rte_force_intrinsics” ./
After a quick research, did not find any useful workaround for this, so I simply commented the relevant 3 lines in the corresponding header file rte_spinlock.h
Then, redo the *make. *This time, I have run into the same problem but now at a different file: rte_atomic_32.h:
...
/usr/local/include/rte_atomic_32.h:9:4: error: #error Platform must be built with RTE_FORCE_INTRINSICS
    9 | #  error Platform must be built with RTE_FORCE_INTRINSICS
      |    ^~~~~
...
Did the same commenting trick again (but now in rte_atomic_32.h), and then I became able to compile pktgen via make.
Running pktgen
We will cover pktgen measurement in a latter part, however, even when you start it, you might encounter an error as follows.
# ./usr/local/bin/pktgen -c ff -n 4 --socket-mem 1024 -w 0000:03:00.0  -- -T -p 1 -P -m "[1:2-3].0"
./usr/local/bin/pktgen: error while loading shared libraries: librte_timer.so.21: cannot open shared object file: No such file or directory
This only happens if you just installed DPDK, exported the environment variables RTE_SDK and RTE_TARGET, but the DPDK application, in this case, pktgen, still does not find the libraries. To solve this, do ldconfig
# ldconfig -pBy having -p at the back, the found libraries are printed out and you can look for librte_timer.so.21. Once you found it, you can restart pktgen without any issue.
We continue our journey in Part III., where we have set up an environment in Cloudlab that contains two physical machines connected back to back through the Bluefield SmartNICs. Then, in Part IV., we can scrutinize DPDK applications and their performance further. Stay tuned and “Rig for Dive and Take Her Down”.